Getting Access
How to access the Partner Data Warehouse
Overview
Access to Monta's Partner Data Warehouse uses Key Pair Authentication for enhanced security. This requires generating a public/private key pair and connecting via Snowflake-compatible tools.
Tool CompatibilityNot all BI or dashboard tools support key pair authentication. If your tool doesn't support private/public key setup, contact your Monta CSM to discuss alternatives.
Quick Start
- Generate key pair → 2. Send public key to Monta CSM → 3. Receive connection details → 4. Connect using your preferred tool
Prerequisites
Before accessing the Partner Data Warehouse:
- Active partnership with a mutual data sharing agreement in place
- Snowflake-compatible tool that supports key pair authentication (SnowSQL, Python Connector, DBeaver, JDBC, etc.)
Setup: Generate Your Key Pair
Mac OS / Linux (OpenSSL)
Generate a 2048-bit RSA key pair using these commands:
1. Generate private key:
openssl genrsa 2048 | openssl pkcs8 -topk8 -inform PEM -out rsa_key.p8 -nocrypt2. Generate public key:
openssl rsa -in rsa_key.p8 -pubout -out rsa_key.pub
Windows UsersFollow Snowflake's key pair authentication guide for Windows-specific instructions.
Send Your Public Key
Share rsa_key.pub with your Monta CSM via email or Slack. This file is safe to share - it contains only the public key. Monta will respond with your Snowflake account identifier and connection details.
Security NoteWe only support unencrypted private keys at this time. Keep your
rsa_key.p8file secure and never share it.
Connection Parameters
Once you receive your credentials, use these values when connecting:
| Parameter | Value |
|---|---|
| Account | st17140.eu-west-1 |
| Host | st17140.eu-west-1.snowflakecomputing.com |
| Username | Your partner name (e.g., examplepartner) |
| Warehouse | PARTNER |
| Database | PARTNER |
| Schema | PRODUCTION_{partner_name} |
| Private Key | Path to your rsa_key.p8 file |
Connecting to Snowflake
Option 1: SnowSQL (CLI Tool)
Install SnowSQL: Follow Snowflake's installation guide for your OS.
Connect:
snowsql -a st17140.eu-west-1 \
  -h st17140.eu-west-1.snowflakecomputing.com \
  -u {your_partner_name} \
  --private-key-path ~/rsa_key.p8 \
  -w PARTNER \
  -d PARTNER \
  -s PRODUCTION_{your_partner_name}
Replace {your_partner_name} with your actual partner name.
Option 2: Python Connector
Install the connector: See Snowflake's installation instructions.
Connect with key pair authentication:
import snowflake.connector
from cryptography.hazmat.backends import default_backend
from cryptography.hazmat.primitives import serialization

# Load private key
with open("~/rsa_key.p8", "rb") as key_file:
    p_key = serialization.load_pem_private_key(
        key_file.read(),
        password=None,
        backend=default_backend()
    )

private_key_bytes = p_key.private_bytes(
    encoding=serialization.Encoding.DER,
    format=serialization.PrivateFormat.PKCS8,
    encryption_algorithm=serialization.NoEncryption()
)

# Connect
conn = snowflake.connector.connect(
    user='{your_partner_name}',
    account='st17140.eu-west-1',
    private_key=private_key_bytes,
    warehouse='PARTNER',
    database='PARTNER',
    schema='PRODUCTION_{your_partner_name}'
)
See Snowflake's key pair authentication docs for more details.
Option 3: DBeaver (Visual Database Tool)
Download the free community edition and follow these steps:
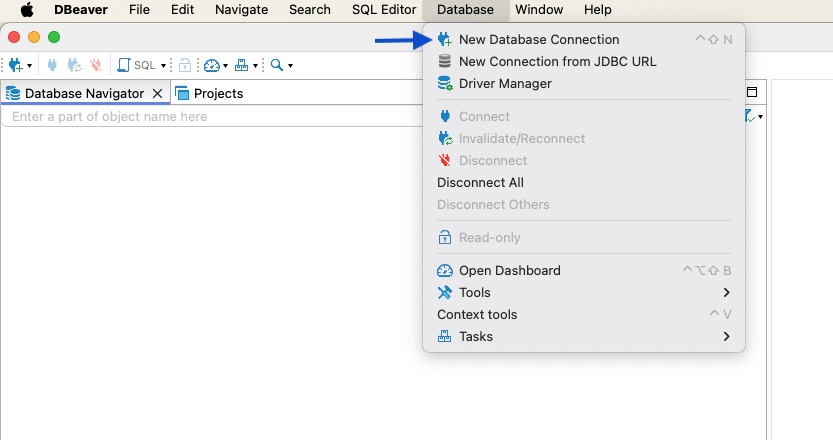
1. Create new connection: Database → New Database Connection
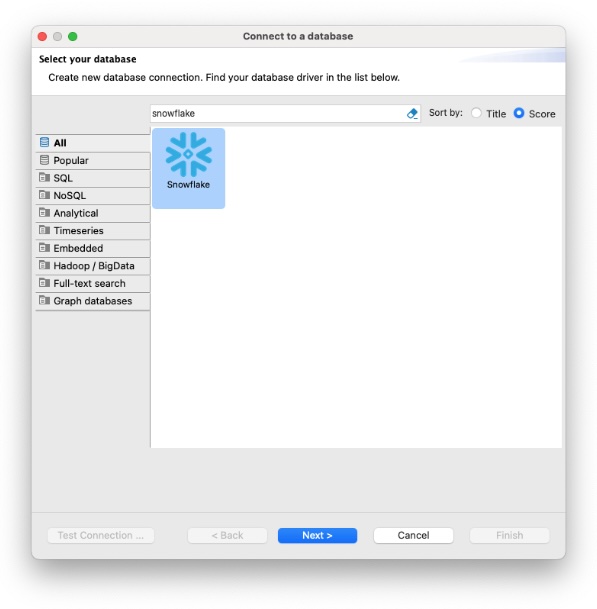
2. Select Snowflake:
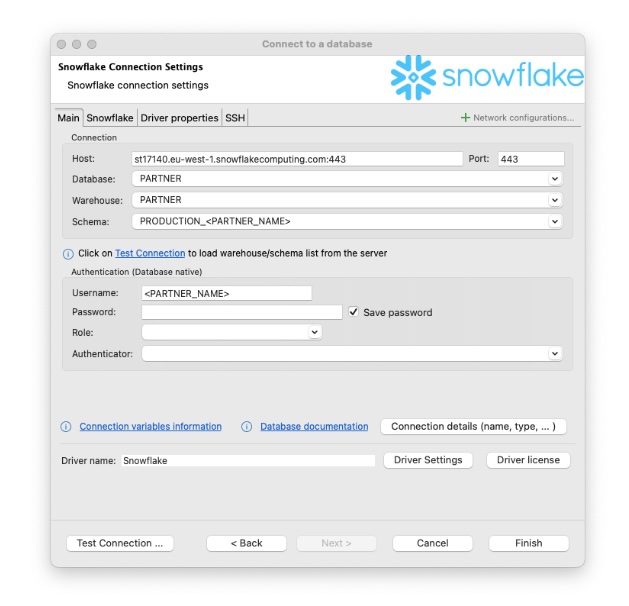
3. Configure connection:
- Host:
st17140.eu-west-1.snowflakecomputing.com:443 - Database:
PARTNER - Warehouse:
PARTNER - Schema:
PRODUCTION_{your_partner_name} - Username:
{your_partner_name}
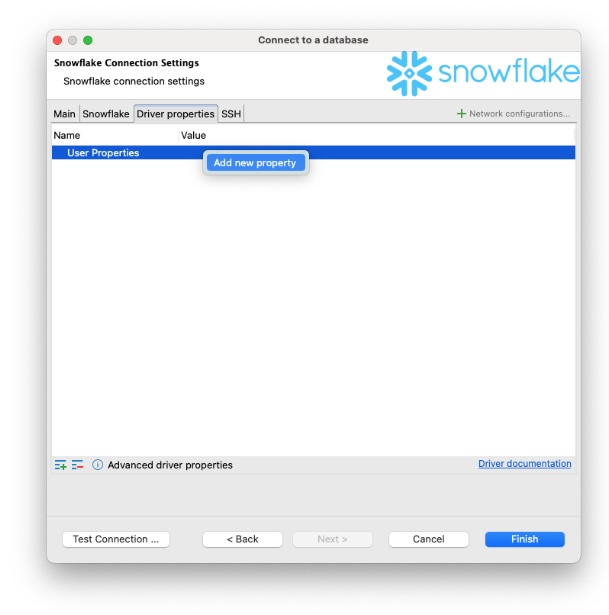
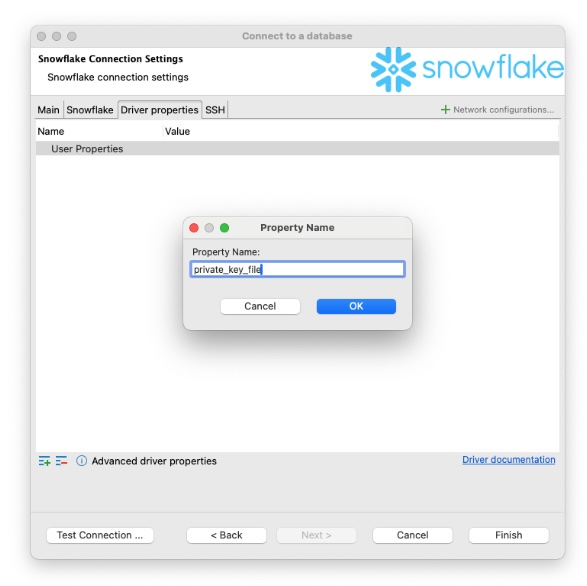
4. Add private key property:
Go to Driver properties → Right-click → Add new property → Name it private_key_file → Click OK
5. Set private key path:
Click the value field next to private_key_file and enter the full path to your rsa_key.p8 file.
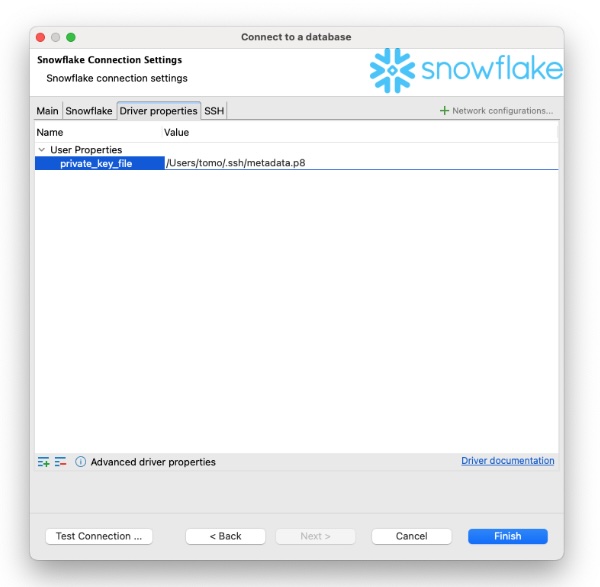
6. Finish: Click Finish. You should see the PARTNER database in your Database Navigator.
Need Help?
If you experience connection issues or have questions, contact your Monta CSM via your usual channel (email or Slack).
Updated about 1 month ago
